🎉 My First Ever Writeup – and Its a First Blood! 🔥
Hey! This is my first CTF writeup ever 😄, and guess what? I managed to grab the First Blood on this challenge 💉 — a proud moment for sure!
🛠️ Tools Used
| Tool | Purpose | Link |
|---|---|---|
| IDA Pro | Static disassembler for binary analysis | 🔗 hex-rays.com |
| JADX | Decompile APKs to Java | 🔗 GitHub |
This challenge, titled Perfect Pair, was part of the Arab Security Cyber Wargames 2025.
It was a mobile reverse engineering challenge involving an Android APK.
🔍 Static Analysis
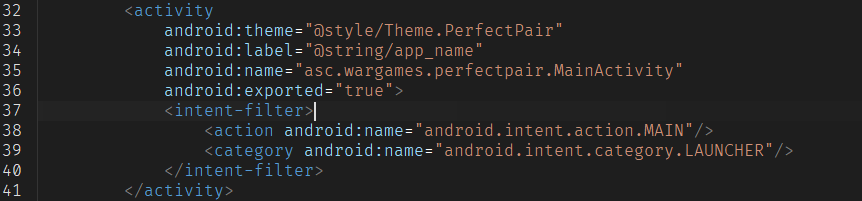
After Downloading the APK, the first step was to open it in JADX to explore its contents. I headed straight to the AndroidManifest.xml to identify the app entry point
While exploring the decompiled code, I noticed that the app was compiled using the Jetpack Compose Compiler — Google modern declarative UI toolkit for building native Android apps faster and more easily.
This made the static analysis noticeably harder. Unlike traditional Android apps that use XML layouts and standard activity flows, Compose-based apps generate a lot of synthetic and compiler-generated classes and methods. These often result in unreadable or abstract bytecode when decompiled, which makes it tricky to trace UI logic or flow between screens using tools like JADX alone.
The entry point, asc.wargames.perfectpair.MainActivity, is where our journey begins.
Inside its onCreate() method, the app sets its UI content using Jetpack Compose:
ComponentActivity2.setContent$default(
    this,
    null,
    ComposableSingletons$MainActivityKt.INSTANCE.m6401getLambda3$app_debug(),
    1,
    null
);
This leads us down a rabbit hole of generated singleton classes. The call goes to getLambda3$app_debug, which in turn calls getLambda2$app_debug, then getLambda1$app_debug, and finally, this chain invokes the core navigation setup method: MainActivityKt.PerfectPairNavHost(). This chaining is a typical pattern for how the Compose compiler wires things up behind the scenes.

This gives us a complete blueprint of the app's structure:
- welcome
- register
- login
- mainmenu
- download
- upload
- flag
An interesting observation here is that while routes like upload and flag are clearly defined, they aren't directly accessible from the main user interface flow. After logging in, the user is taken to the mainmenu, which only seems to offer two visible buttons: "Download" (leading to the download screen Download firmware_v2.bin) and "Logout" (which presumably calls the logout route to end the session).
Now that the app structure is clear and the main accessible routes are identified, it time to analyze the most intriguing part — the flag activity 🔍.
The upload route will be analyzed later, after confirming the behavior of the flag activity.

Upon inspecting the FlagActivity, it turns out there nothing useful or interesting happening directly within it However, scrolling further through the code reveals a method near the end named redirectToRealFlagActivity().
This method doesnt contain any validation or complex logic — it simply launches another activity called RealFlagActivity.
That where things might get more interesting.
So, let move on and see what inside RealFlagActivity 👀.
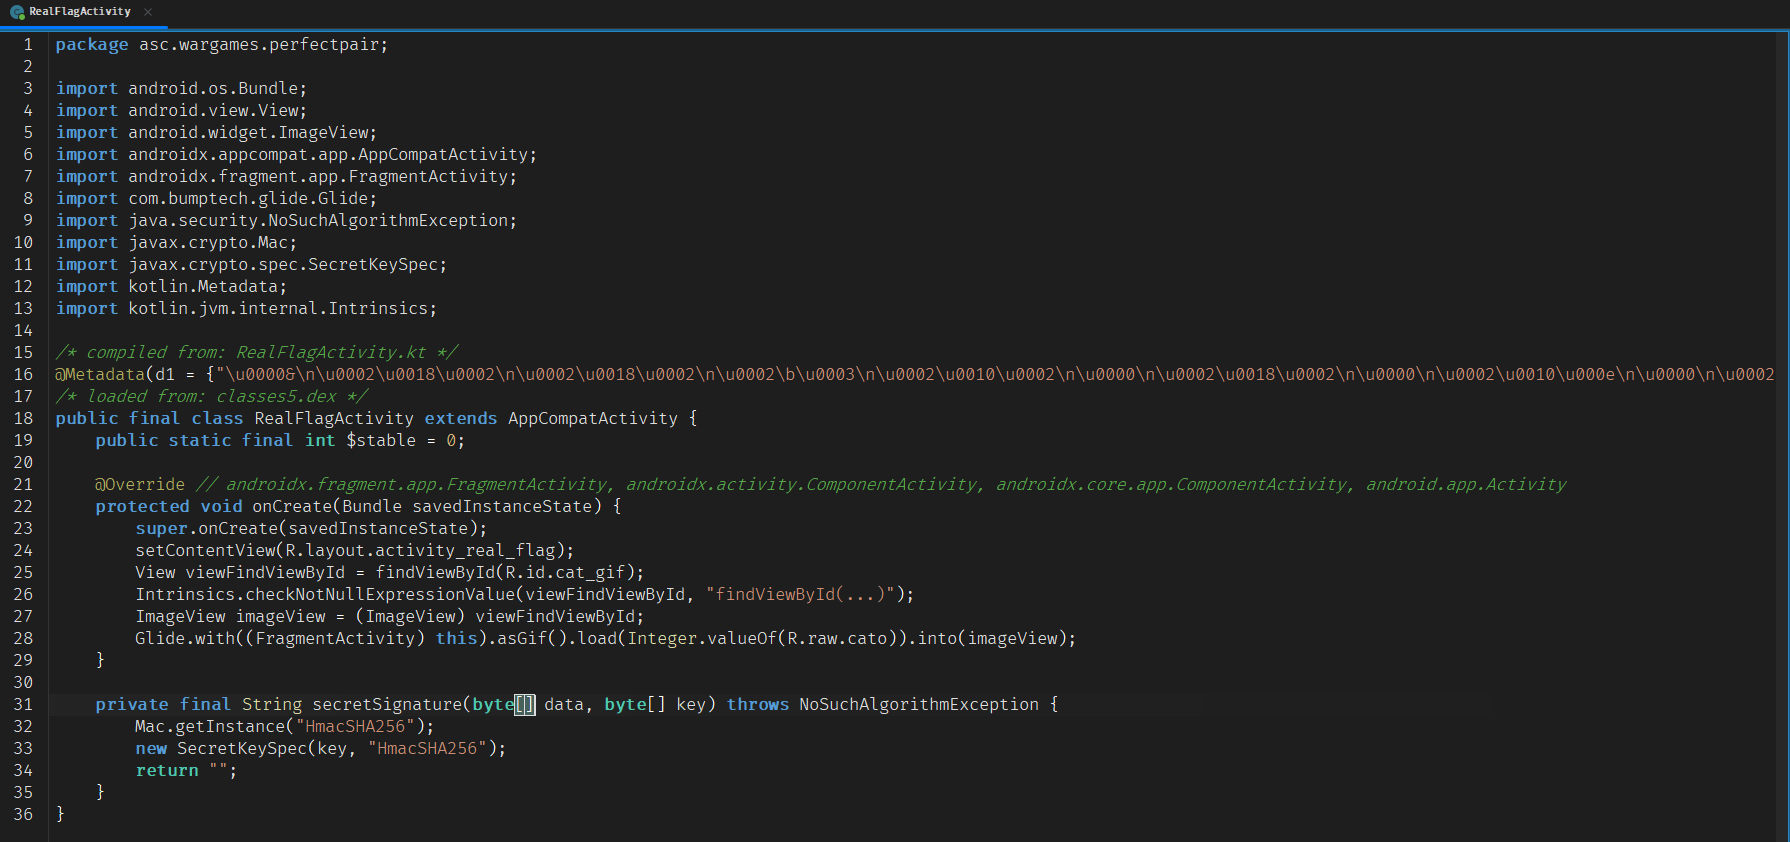
Right under the cato image there a method called secretSignature that takes two byte arrays: data and key. It sets up an HMAC using HmacSHA256 like this:
private final String secretSignature(byte[] data, byte[] key) throws NoSuchAlgorithmException {
    Mac.getInstance("HmacSHA256");
    new SecretKeySpec(key, "HmacSHA256");
    return "";
}
At first glance, it seems important — maybe it was supposed to verify something or generate a secure value — but after searching through the entire codebase, it turns out the method is never actually used.
It might just be a leftover, or maybe a decoy. Either way, its not something we need to worry about for now.
Also, that cat image might be a hint for something well discover later. But from a code perspective, there nothing functional happening in either FlagActivity or RealFlagActivity.
So lets move on and dig into what happening inside upload activity.
After digging into the functionality of upload activity, I found that it allows the user to select a firmware file — similar to what happens in the download flow — and then uploads it to the server.

While tracing the upload logic, I noticed there a Response Interceptor hooked into the network layer. This interceptor listens to the server response and — surprise — that where the flag is returned!

So now its clear: the server is expecting a specific firmware file. If we upload the right one, it sends back the flag in the response.
Time to figure out what that expected firmware looks like.
At this point, I couldnt find anything else interesting in the code itself, so I thought — maybe there something useful hidden in the resources.
And bingo! I spotted a native library bundled inside: liblibsign.so.
And… its not used anywhere in the app.
Now that raised some eyebrows.
Looks like the developer left behind something they really shouldn't have. Either they forgot to strip it out… or they didnt realize how revealing it might be. Either way, were not complaining 😏
Lets crack it open in IDA Pro and see what secrets its hiding.
The first thing I always check when opening a native library is the list of exported functions — they usually give a quick overview of what the library is meant to do.
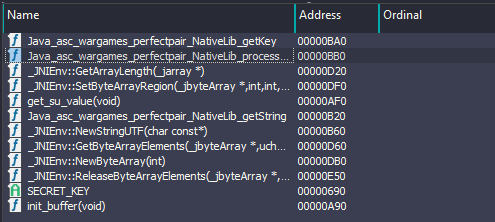
And from the look of it… there are some very interesting functions & Secrets here 👀
Let’s analyze this and see what the developer accidentally left for us.
First, let’s take a quick look at the SECRET_KEY Export.

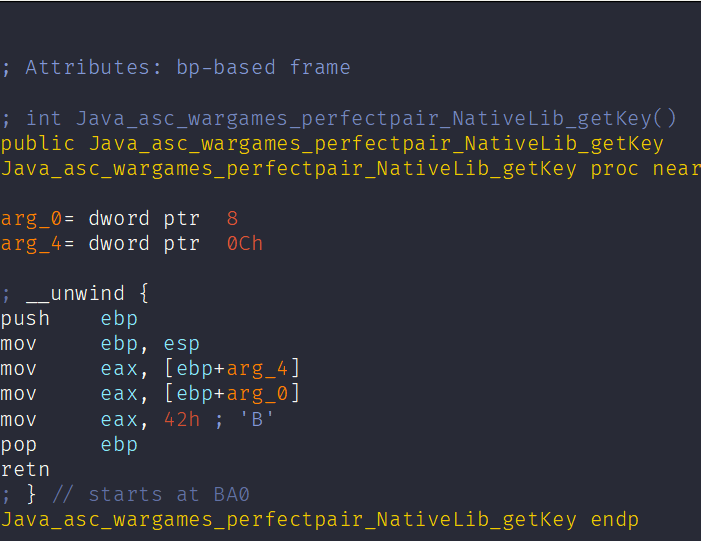
Now let’s check out the Java_asc_wargames_perfectpair_NativeLib_getKey function.
Next up, the function that really caught my eye is Java_asc_wargames_perfectpair_NativeLib_processData. The name suggests it’s pretty important, so let’s dive into it.
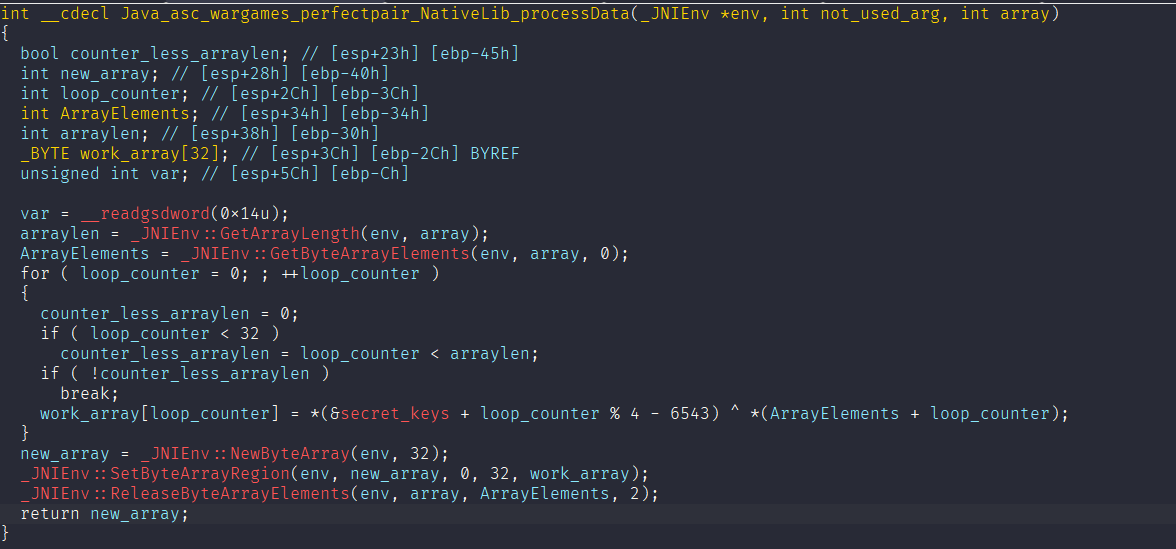
From a quick look, this function reads the input byte array, XORs each byte with values derived from secret_keys, and returns a new byte array. The way the key is accessed and applied hints that this function might be handling decryption or data transformation. Let’s break it down.
What is the key calculated by (&secret_keys + loop_counter % 4 - 6543)?
The secret_keys symbol points to:
.got.plt:0000202C secret_keys dd offset stru_1F5C
Now let’s assume loop_counter is 0.
Then the calculation becomes: (0x202C + 0 % 4 - 6543) = 0x69D
Address 0x69D corresponds to:
.rodata:0000069D aMeow db 'meow',0
So, it reads 4 bytes from this address — meaning the key used here is "meow".
Lets Play With the Firmware!
Now that I have collected two interesting keys:
66(fromgetKey())"meow"(from the secret memory location)
I had a strong hunch that the function processData() in the native library is responsible for firmware encryption.
So, let’s test this out!
XOR with Key 66
I tried to XOR-decrypt the downloaded firmware using the key 66.
And guess what? It worked! The result looked like this:
USERNAME=_______________
TEAM_ID=0000
DATA=SMARTLOCK_FIRMWARE
SIGNATURE=________________________________
Now things are making more sense!
We can now confidently say:
- Firmware encryption key =
66 - there is a
SIGNATUREfield… and we just so happen to have another key ("meow") left unused…
Hmm… where have we seen meow before?
Right! Back in RealFlagActivity, under the cat image, there was a function called secretSignature. It takes data and key, and uses HMAC-SHA256.
Looks like we’ve just cracked the full flow!
Final Conclusion
Let’s sum it up:
processData()encrypts/decrypts firmware with XOR using key66.SIGNATUREis generated viaHMAC-SHA256using key"meow"(from memory address0x69D).- The cat image + the unused
secretSignature()were actually important hints.
Let’s automate this!
write python script to genreate firmware
import hmac
import hashlib

SIGN_KEY = b"meow"
XOR_KEY = 66
USERNAME = "ilovebits_ahmed"
TEAM_ID = "0007"
firmware_content = f"""USERNAME={USERNAME}
TEAM_ID={TEAM_ID}
DATA=SMARTLOCK_FIRMWARE
""".replace("\n", "\r\n")
signature = hmac.new(SIGN_KEY, firmware_content.encode(), hashlib.sha256).hexdigest()
final_firmware = firmware_content + f"SIGNATURE={signature}\r\n"
encoded_bytes = bytes([b ^ XOR_KEY for b in final_firmware.encode()])
with open("patched_firmware.bin", "wb") as f:
    f.write(encoded_bytes)

print("[+] Firmware patched and saved.")
and the script to upload the patched firmware
import requests
import os

BASE_URL = "http://34.136.125.67:5000"


def upload_firmware(jwt_token: str, file_path: str):
    if not os.path.exists(file_path):
        return {"error": f"File not found at {file_path}"}
    url = f"{BASE_URL}/api/firmware"
    headers = {
        "Authorization": f"Bearer {jwt_token}",
        "Content-Type": "application/octet-stream",
    }

    print(f"Uploading firmware to: {url}")
    print(f"File size: {os.path.getsize(file_path)} bytes")

    try:
        with open(file_path, "rb") as f:
            file_data = f.read()
            response = requests.post(url, headers=headers, data=file_data, timeout=30)
        print(f"Upload successful (Code: {response.status_code})")
        return response.json()
    except Exception as e:
        print(f"❌ An unexpected error occurred: {e}")
        return {"error": str(e)}


if __name__ == "__main__":
    jwt = "account_jwt"
    patched_firmware = "patched_firmware.bin"
    result = upload_firmware(jwt_token=jwt, file_path=patched_firmware)
    print("\n--- Server Response ---")
    if result:
        print(result)
let’s run this
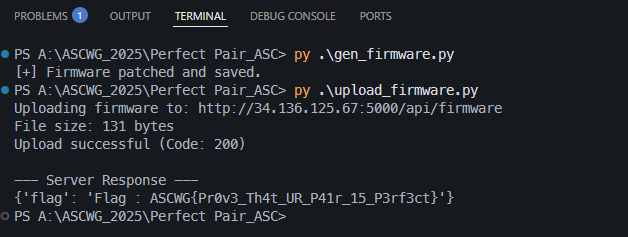
And with that, the server responded with the flag! A super fun challenge that required connecting dots from the Java layer, native code, and even subtle hints in the UI.